Training: Use of Nox Medical Devices and Noxturnal Software
Created as part of the Sleep Revolution Project
1. Installation of Noxturnal Software
Noxturnal System Requirements
Note: The computer used must comply with the international standard IEC 60950-1 for the safety of information technology equipment. Note: It is recommended that a virus protection be installed on the computer running Noxturnal.
The following shows the minimum hardware requirements needed to install and operate the software effectively.
| Hardware Type | Minimum Requirements |
|---|---|
| Operating System | Windows 8.1 |
| Processor | x64 based Intel or AMD |
| Processor Clock Speed | Speed 1.7 GHz or faster |
| Memory | 2 GB or more Free |
| Hard Drive Space | 4 GB or more |
| Graphics Resolution | 1024×768 or higher |
Initial installation of the Noxturnal Software can be achieved as follows:
- Make sure to be logged onto the system with administrator privileges.
- Using the following link, https://noxmedical.com/downloads-row/, the newest version of the Noxturnal software may always be found.
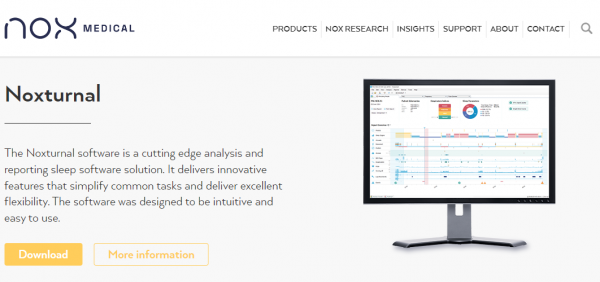
- Click “Download” as seen in Figure 1.
- When the .exe file has been downloaded (“Setup.exe”), click on it to run it.
- An installation wizard will open that guides the user through the installation. Follow these instructions.
- You should now be able to open the software. It can be found in your computers search engine by using “Noxturnal” as the search word.
- To run the Noxturnal application, double-click on the desktop icon or click on the application icon in the Windows start menu.
- To close application either click on the X in the top right corner, or on the File menu choose Exit.
Standard operation
When Noxturnal starts up, two pages appear on the worksapce: Recording and Library.
In the Recording tab recordings are configured and downloaded. If you have a Nox recording device connected, you will see a panel with information about the connected device and two options: “Configure Device” and “Download Recording” (as shown in Figure 2).
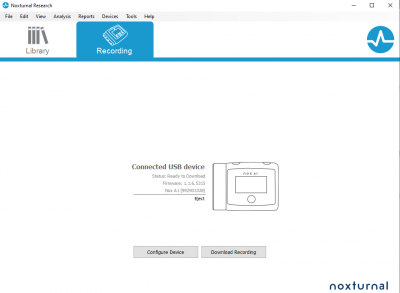
- Configure Device: To start a new ambulatory recording, select this option. A configuration wizard will guide the user through the configuration process. For more information, refer to the section Starting a New Ambulatory Recording (see section 2.1.).
- Download Recording: If a recording device is connected and it contains a recording, the user may download and review the recording. For more information, refer to the section Downloading an Ambulatory Recording from a Nox Recording Device (see section 4).
The tasks performed on the recording device depend on the device status which can be the following:
- Empty – The device has not been configured and does not contain any recordings. Click Configure Device to configure the device for a new recording.
ATT! Please note that configuring the device will remove any existing recordings from the device.
- Ready to Record – The device has been configured but does not contain any recordings. At this point the user can disconnect the device from the computer and initiate the recording process.
- Ready to Download – The device contains a recording that has not been downloaded to the computer it is connected to. Click on the Download Recording button to download the recording to the computer if it has not been downloaded to another computer.
- Download Complete – The device contains a recording that has already been downloaded and has been added to the recording library.
The Library tab in the top left corner is used to open the recording library. The library stores a list of all recordings that have been recorded, downloaded or manually added to the recording library.
2. Configuration of the Nox A1s device
Noxturnal is used to configure and download recorded data from Nox recording devices. To work with a recording device, start by opening Noxturnal and connecting the device with a USB cable to the computer.
Noxturnal automatically detects the device and displays information about the device. Detection can take few seconds. When Noxturnal detects the connected device the following information about the device is displayed: • * Recording status • * Firmware version • * Device name.
When you are done working with the device click on the Eject link and unplug the device from the computer.
2.1 Starting a New Ambulatory Recording
Start the Noxturnal application and connect your device to the computer using a USB cable.
- Noxturnal will automatically detect the device and show its information on the recording page.
Click on Configure Device button
- Configuration Wizard will open that will guide you through the configuration process, all steps are mentioned below with screen shots for further explanation.
Step 1. Define the Recording type that is to be used.
In the Recording type dropdown menu (Figure 3, box 1), choose Nox SAS. Note: the set-up image should reflect the recording type you choose.
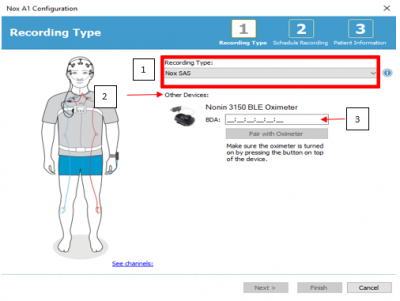
When Nox SAS is chosen as the Recording type in the A1s device configuration, the Nonin Oximeter is automatically shown below the Recording type option under Other devices (Figure 3, box 2).
Enter the BDA number/address (can be found on the oximeter itself) in the relevant field (Figure 3, box 3) and then click Pair with Oximeter button and wait for response.
ATT! Please note that batteries need to be in the oximeter and it has to be turned on (by pressing the button of the oximeter itself) when performing the above step.
If you are always using the same pair of A1s and Oximeter then the BDA number appears automatically.
Click Next to move on to step 2.
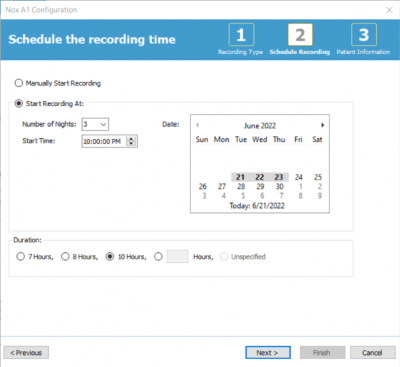
Step 2. Schedule Recording time.
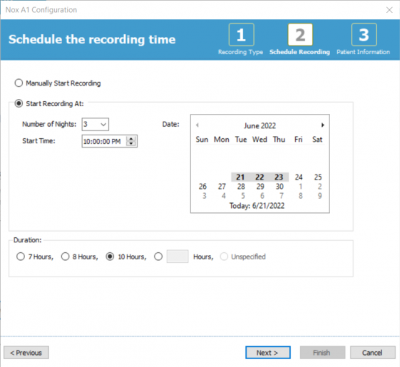
When setting the recording time, the user/clinician can choose between a Manual start and automatic scheduled start.
Choose scheduled start by checking the Start Recording At option. This option is ideal for multiple night recordings.
When this is checked the user/clinician can pick number of nights, start time and duration of recording for up to 4 nights in a row. The standard procedure in the Sleep Revolution is 3 consecutive nights, starting at 10 PM with a duration of 12 hours. See Figure 4.
In this part of the configuration process the researcher adds the patient/study information. The only required field is Patient name OR the ID. The rest of the specific patient information is optional to use.
After entering the relevant patient information, click Finish in order to write the configuration to the device.
Note! If there is a pre-existing recording on the device the user/clinician will be asked if he wants to erase the recording from the device. Press Yes if you are sure that the study is already downloaded.
When successful configuration has been achieved a confirmation window, see image below, will appear.
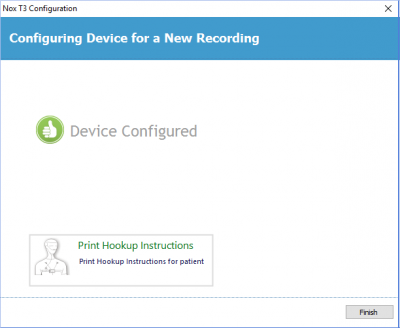
Your device is now ready for a patient hook-up and subsequent sleep study(ies).
3. How to perform the SAS hook-up and packing instructions
3.1. Nox SAS-system hook-up – Instructional video
There are two laminated sheets in the equipment case: 1. SAS instruction picture 2. QR code to an instructional video and important information
The instructional video for how to perform the Nox SAS-system hookup can be found via the following link: https://noxmedical.com/sas/
Note that the user needs to accept cookies to be able to view the video.
The instructions are currently available in three languages; English, Icelandic and Norwegian.
If needed there is a detailed brochure (SAS – Patient facing manual) that can be handed out with the carry bag if participants do not wish to use the instructional video, or if they want additional instructions.
3.2. Preparation of Nox A1s recorder SAS setup
The SAS setup is composed of a carrying case which holds the kit required to conduct a SAS sleep study (Table 3.3). The kit includes:
- A bag which holds all the electrodes and adhesive strips.
- A cardboard backing sheet which has the Nox A1s recorder prepared with the head cable, nasal cannula, ATC cable, and RIP belts.
- Two body cables.
- The pulse oximeter.
- Other consumables:
- Band aid roll
- Alcohol wipes
- Neck band
- Single use wristbands
Written instructions accompany the SAS sleep study.
- SAS – Instructions for participants (QR code to video and laminated information)
- Patient facing manual
3.3. What you need to prepare a SAS sleep study kit
3.4. Preparing the cardboard backing sheet
3.5. Packing the carrying bag
 | Place 3 x wristbands in. |
 | Place 2x Alcohol pads to clean skin, only to be used for the first night. |
 | Close the bag. The SAS sleep setup is now ready to be given to a study participant. |
4. Downloading an Ambulatory Recording from Nox A1s recording device into Noxturnal
4.1. Download location
- Recordings should be downloaded to a predetermined data storage location
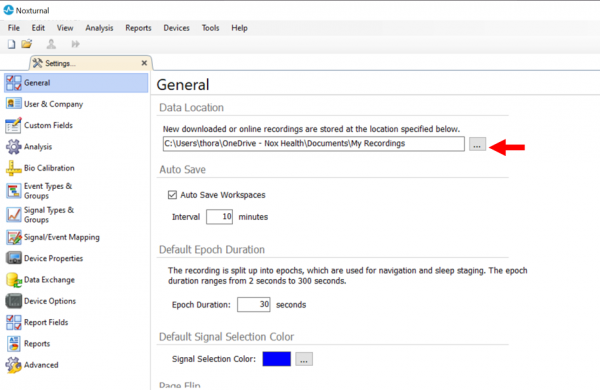
- This location can be changed by clicking Tools Settings…General (See Figure 7)
- The top option Data Location will allow user/clinician to browse and choose the preferred data location (See Figure 8)

4.2. Downloading a recording
Ensure that Noxturnal is open and running.
Connect the Nox A1s device to a USB port on the computer.
Noxturnal will automatically detect the device and show its information on the Recording Page (See Figure 9). Detection may take a few seconds.
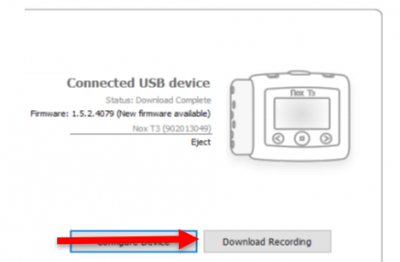
Click on the Download Recording button. Noxturnal will start downloading the recording from the device to the computer.
After download is complete the user is notified and can subsequently start working with the recording. The user can at this time look at the study quality an evaluate it. If it does not have at least 2 nights with at least 4 hours of good signals it needs to be repeated.
Downloaded recordings are automatically added to the recording library and can be reviewed and edited any time by going to the recording library and clicking on them. (See Figure 10)

4.3. Opening and Viewing studies in Noxturnal
When the recording is opened in Noxturnal the Recording Result page shows an overview of the study. If a study has been configured with the Nox SAS Recording Type, this workspace will appear as shown in Figure 11.
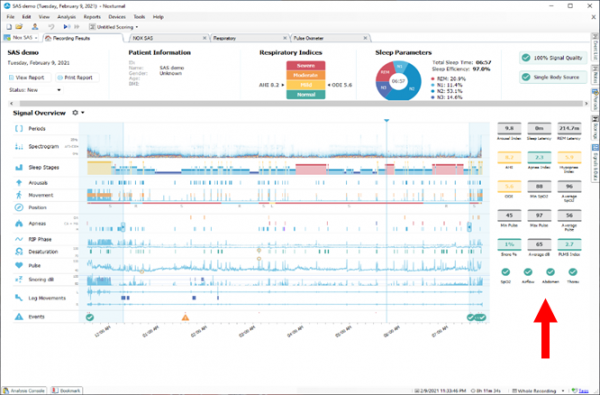
If an analysis has been run (the Nox SAS automatic analysis is included in the SAS Recording Type), the main results are shown to the right on the recording results page (See Figure 11).
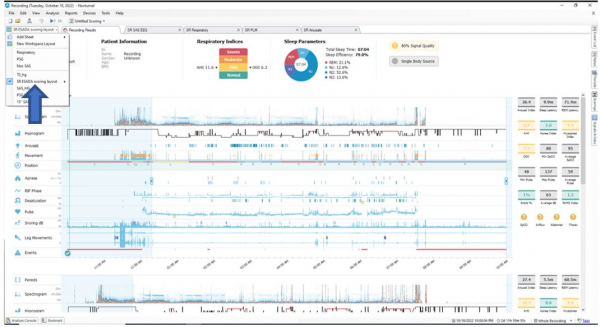
You should already have imported the SleepRevolution workspace (SR scoring layout). To select the correct layout you click on the icon as seen in Figure 12 and select SR ESADA scoring layout.
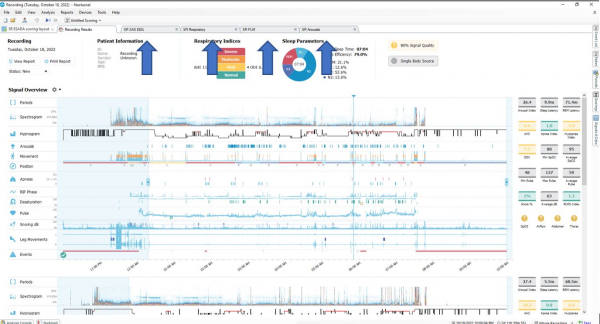
To view and score the recording, click on the SR SAS EEG scoring sheet, SR Respiratory, SR PLM sheet and SR Arousal signal sheets as appropriate: Please make sure that you have at least two nights with minimum of 4 hours of good quality (See Figure 13). Refer to the scoring manual for further instructions on scoring in Noxturnal.
5. Receiving Nox A1s SAS equipment after home sleep testing
5.1. Receiving Carry bag after use
Open the carry case and throw away disposable items if they have not been disposed of at patient’s home:
- Nasal Cannula
- RIP belts
- Used single-use electrodes
- Neck band
- Cardboard
- Single use battery
 |   |
| Throw away all electrodes, adhesive strips, alcohol swabs, or any other sensors or trash. | Throw away the cannula and RIP belts. |
 |  |
| Throw away the cardboard. | Throw away the neck band. |
 |  |  |
| Disconnect the body cables from the Nox A1s recorder. | Disconnect the ATC cable from the Nox A1s recorder. | Do not disconnect the head cable. |
Open the battery lid with the key pen, remove the battery, and connect the device to the computer with a USB-C cable.
 |  |
| Open the battery lid with the key pen. Remove the battery. | Connect the device to the computer with a USB-C cable. |
5.2. Using sanitizing wipes to clean the Nox A1s recorder, cables, oximeters and the carry bag
All cables provided by Nox Medical for the SAS setup are reusable. Clean the Nox A1s, the oximeter with probe, the cables and the carry case with a soft cloth dampened with hospital grade cleaner.
- Do not immerse the cables in liquid and avoid contact of the cleaning solution with the connectors.
- Do not pour or spray any liquids onto the devices, and do not allow any liquids to enter any openings on the devices.
- Allow the unit to dry thoroughly before use.
Recommended disinfection material is: Super Sani-Cloth Plus disinfection wipes (from PDI) or other material including Sodium hypochlorite diluted with water at 1:500 (bleach) or 70-90% isopropanol.
- esada_instructions/nox_devices_and_noxturnal_instructions.txt
- Last modified: 2023/11/27 12:12
- by benedikt


