Openconnect is no longer supported, refer to the official instructions in the Official RU VPN instructions
====== OpenConnect VPN client installation guide ======
These instructions guide you through the process of downloading and installing Open Connect which is an open source VPN client.
==== For Windows ====
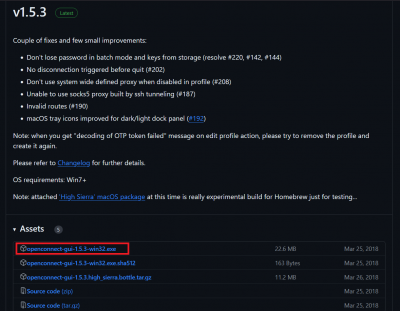
* Please go to https://github.com/openconnect/openconnect-gui/releases and scroll down to Assets.
* Choose the one that is on the top of the list (as seen in the red box in Figure 1) and the downloading should start automatically.
<figure>  <caption> For Windows: The option in the red box is the one you should select to download. </caption></figure>
* When the download is complete open the downloaded installer and follow the instructions, choose Allow → Next→ I Agree.
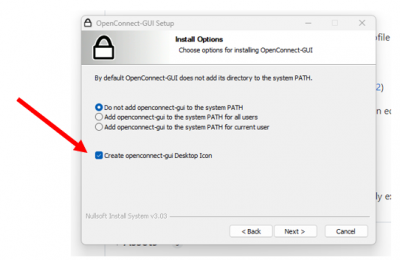
* Mark the option for creating a Desktop Icon as shown in Figure 2 and then click on Next until you get to Finish and the installation will start.
<figure>
  <caption> The red arrow shows where to mark the option for creating a Desktop icon. </caption></figure>
* Now the installation is complete and you can find the OpenConnect VPN client on your Desktop. The icon is seen in Figure 3.
<figure>
 ![]() <caption> The OpenConnect VPN client desktop icon. </caption></figure>
==== For Mac OS ====
* Please go to https://github.com/openconnect/openconnect-gui/releases.
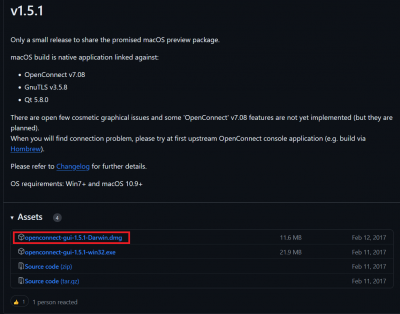
* Scroll down to v1.5.1 and click on Assets
* Choose the one that is on the top of the list (as seen in the red box in Figure 4) and the downloading should start automatically.
<figure>
<caption> The OpenConnect VPN client desktop icon. </caption></figure>
==== For Mac OS ====
* Please go to https://github.com/openconnect/openconnect-gui/releases.
* Scroll down to v1.5.1 and click on Assets
* Choose the one that is on the top of the list (as seen in the red box in Figure 4) and the downloading should start automatically.
<figure>  <caption> For Mac OS: The option in the red box is the one you should select to download. </caption></figure>
* Once the dmg file is downloaded, install it in the same manner as you typically install applications on your computer.
==== The next set of instructions should be similar for Windows and Mac ====
Note: the application you installed may look differently than the one shown in this guide.
Open the OpenConnect VPN client by clicking on the icon.
Figure 5 shows the window when the OpenConnect VPN client is opened and it allows you to select a server. The first time you open the GUI you will have no configured servers.
To configure a server, you need to click the small cogwheel button on the right side of the sever dropdown list (red). In the drop down list you select New Profile.
<figure>
  <caption> To configure a server you click on the cogwheel marked in red. </caption></figure>
Figure 6 shows the window that pops up after selecting New Profile.
<figure>
  <caption> New Profile created. </caption></figure>
You need to check in Customize and type SR VPN in the Name window and ruvpn.ru.is in the Gateway window and then select Save. Figure 7 shows the correct configuration.
<figure>
  <caption> The correct configuration of the new server profile. </caption></figure>
After saving the profile, everytime you open the OpenConnect VPN client you will see the window shown in Figure 8.
<figure>
  <caption> The start window of OpenConnect VPN client after configuring the server. </caption></figure>
when you select Connect you will get the window seen in Figure 9 and as you can see in GROUP it should say RU. If not select it from the drop down list.
<figure>
  <caption> </caption></figure>
After clicking on OK you will be asked for username and password (provided by Sleep Revolution team). The username should be your_username@sleep.ru.is where your_username is specific to you.
<figure>
  <caption> </caption></figure>
After login the VPN is connected and you are now able to connect to a virtual machine to access data.